Posted on October 11, 2020
We're back for Part II! If you missed Part I to help you source some of the parts, go back and read it first.

Ok! You've got your part! Now how do you build this thing?
Part II: The Build

This time around, Scott's going to take you thru the process:
Some background: I've been putzing around with a soldering iron and electrocuting myself by touching the insides of electronics since I was 13 or so. I've also been building guitar pedals for a while, so didn't think this project would be too difficult to complete. I still consider myself a novice when it comes to electronics in general, but I can manage my way around a schematic. Mostly, I'm able to follow instructions, and I enjoy to taking my time building these types of projects.
For anyone doing research on this particular keyboard, the first thing to note is that the Helix Pico is the compact version of the Helix keyboard. They both share the same basic components, the main difference being that the Helix has 5 rows of keys while the Helix Pico has 4.

An example of how it's typically used via Booth.pm
The Helix Pico is designed as a split ortholinear keyboard. Yushakobo sells a variety of kits with most of the basic parts needed to build full keyboards and partial keypads. Audra opted for the red case Helix Pico set, because, why not if we're getting this shipped all the way from Japan, right? The case isn't necessary to use the finished keyboard. It's not really even a full case, just a dress-up part, and it seems that there are many variations out there. I'm sure you could 3D print or cut your own.
Both the Helix and Helix Pico in kit and parts form are easily purchased if you live in Japan. Since we don't, we ordered it from Yushakobo, then had it mailed to a forwarding company. In the past, items purchased in this matter would arrive to our home in Hawaii in a matter of weeks. Due to the global pandemic, it took over 2 months for it to arrive!
If you live in the United States, and find all of this a bit much, there are alternatives to the Helix Pico out there. Check out the OLKB subreddit to see other keyboards you could possibly make. That said, I'm not sure where you can purchase the exact Helix Pico kit in the US. During my brief research, I did find that the standard 5 row Helix PCB and kit was available from Little Keyboards. I'm not 100% sure, but it looks like it's possible to break off the last row at the bottom of the PCB to covert it into the Helix Pico. Please research this prior to purchasing.
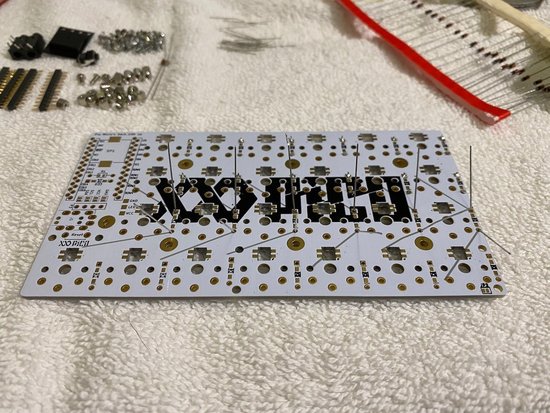
Once the kit arrived, I checked the bill of materials and matched them up to all of the parts in the kit to make sure I had all of the parts prior to assembly. The full kit consists of 2 x Helix Pico PCBs, 2 Pro micro Arduino controllers, and all the other hardware needed to put it together. The 50 Kailh low-profile Choc switches and 50 keycaps were purchased separately.
Before you begin, you'll want to dig into the Helix firmware repository on GitHub. This repository is from the creator of the Helix keyboard, Makoto Kurauchi, and is written in both Japanese and English. Although the guides are for the Helix, they can also be applied to the Helix Pico.
If you watched Mateusz's video, you saw how easy he made it seem to build this keyboard. My take: if you have decent soldering skills, and a lot of patience, you can build this easily. It does help if you can read Japanese as all of the build documentation is in Japanese. Luckily, Google Translate exists, and Audra can read enough Japanese to help in areas where Google Translate didn't do that great of a job.
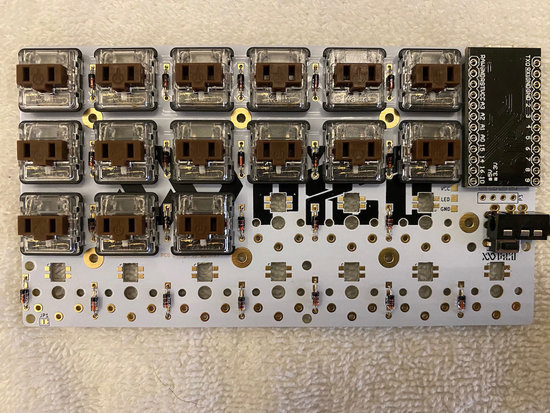
The most difficult part of the build, was essentially because I couldn't read Japanese. I was troubleshooting why the keyboard didn't make any startup chime when plugged in and wasn't recognized by the software used to program it. Turns out that I installed the Pro Micro in the wrong set of rows on the PCB. There are two rows right next to each other, and of course I installed it into the wrong ones. Moving the Pro Micro into the proper place immediately allowed the keyboard to function properly. Whew~!


Building the keyboard was easy by comparison to creating a custom keymap to work with it. If you want to use the Helix Pico as a regular keyboard, the Pro micro that is supplied with the kit should already be programmed with the Helix Pico's standard keymap. You won't need to read further.
★ ★ ★ ★
However, if you want to customize the Helix Pico to use as a shortcut keyboard for applications like Photoshop, Procreate, Clip Studio Pro, and others, you'll need to be able to remap all of the keys. This is specifically why Audra wanted this keyboard.
One of the coolest things about this keyboard and others like it, is the ability to program multiple "layers" (up to 15) of custom keymaps in one keyboard. This means you can switch layers to have a keyboard specifically for each application or mode you want at the press of a key. In Mateusz's video, he uses the fantastic online QMK keymap configurator to program his keyboard. This was one of the big selling points for me to take on this project. Mateusz made it seem that programming the Helix Pico would be so easy. 1, 2, 3 and done!
Unfortunately, it wasn't.
When I was ready to map the Helix Pico keys to the keymap that Audra wanted, I opened up the QMK online configurator tool and got started. It was really easy to do. Just drag and drop the keys you want onto each area of the keyboard using the on-screen GUI. When you've got your keymap set up just right, press the compile button to download the firmware and load it into the Helix Pico. This is usually how it's supposed to work, but for some reason, none of the Helix configurations compiled correctly. After many long hours of searching for a solution, it seems like this is a known issue for a while and it hasn't been fixed.
So what to do? This meant I had to dig in and learn how to build and compile the keymap manually. I won't go into the long process that I went through to do this, but I'll outline the steps and resources you'll need if you want to build the Helix Pico keymap using QMK.
You'll need to start by installing QMK (Quantum Mechanical Keyboard) Toolkit. Since I built this on a Mac, my instructions will be based on that, but Windows and Linux are also supported in their docs.
For Macs, you'll want to install Homebrew package installer first. I won't go into how to do that, but I hope you're comfortable typing commands into the Terminal app to do so.
Next, download QMK Toolbox.
Then, setup your QMK Environment.
Once you've done that, you can start digging in to the guts of configuring a keymap. Read this: Keymap overview
You'll also need to learn about the QMK key codes to populate your keymap with the correct keys.
If you get confused or frustrated, read the Keymap FAQ.
Helpful links to learn QMK and customize your keyboard:
★ ★ ★ ★
Now that they're built, the question is how to use them? I'll be back with Part III: Using the keyboards
Share this:Kaneohe Library Mini Con
Sunday, June 14
10am-2pm
McCully-Mo'ili'ili Library Mini Con
TBA
